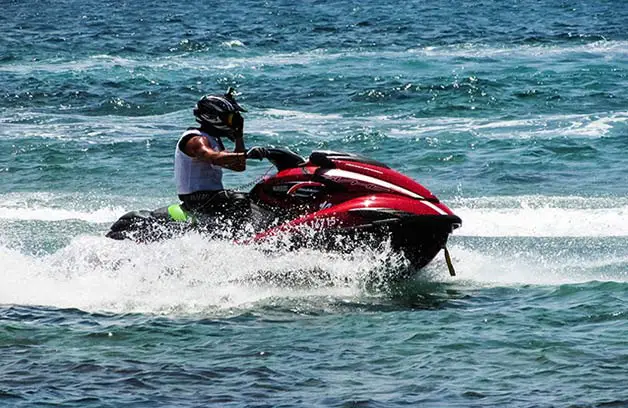
Sea-Doo parent company Bombardier first flirted with the PWC market way back in the late 1960s with an abbreviated two-year run, then went back to snowmobiles for the next 20 years.
But when Sea-Doo reentered the field in 1988, it quickly became a favorite and the company would go on to capture about half of all personal watercraft buyers.
In the company’s illustrious history, they have produced many of the most reliable machines made. Still, certain known issues have developed along the way – some common to all brands, and some specific to the Sea-Doo line.
Let’s take an overview of what might go wrong with your Sea-Doo, and whether it might be something you can fix yourself or a larger problem that will likely require a trip to the dealership to resolve.
Contents
1. Fouled Plugs
At the top of the chart for running issues for any personal watercraft regardless of the manufacturer are fouled or seized spark plugs.
Spark plugs are obviously not designed to be wet, and personal watercraft is. It’s a harsh environment for the spark plugs and other electrical components.
The latter can be a bit more complicated, but changing spark plugs is usually easy. However, due to the wet conditions even inside the hull, they sometimes will be difficult to remove due to corrosion.
If your spark plugs offer significant resistance to being turned – remember, lefty loosey, righty tighty – don’t force the issue. Better to spray a bit of quality penetrating lubricant like PB Blaster or an equivalent around the head where the plugs are located. Wait a few hours, or overnight, and try again.
Should you snap a plug off, an accomplished mechanic – that may or may not be you – can still extract the broken sparker with an easy-out extraction tool. Kits are sold that include the proper sized drill bit along with a second tool that is forced into the hole to allow you to safely remove the plug.
Do not attempt this unless you are confident with your skill with a drill – you could make a cheap and simple problem vastly worse if you so much as nick the cylinder head itself.
The best practice to avoid this issue is to use a small amount of anti-seize on the threads before installing, or even a bit of motor oil. Also, it’s a good idea to simply replace the plugs at the end of the riding season and avoid letting rust take hold during winter storage.
2. Rough Running Engine
Most of the time spark plug replacement will address an engine that is running roughly, or a PWC that exhibits diminished performance. But myriad other factors could be at fault.
If the spark plugs have been replaced and the spark plug caps reinstalled correctly, the issue could be traced to ignition system wiring, or the engine control monitor (ECM) itself. This will likely require a dealer or certified PWC mechanic to address.
More modern models will show a fault code at the dash that can be checked against your owner’s manual to determine the severity of the issue. Older models will require someone with a strong working knowledge of ignition systems to diagnose.
If the problem is not electrical in nature, it may be something you can address yourself.
Note: Sea-Doo owner’s manuals are well written, easy to understand, and an invaluable resource for both proper maintenance and troubleshooting problems. If you do not have the paper owner’s manual provided by the dealer, Sea-Doo manuals are available here in PDF form.
3. Bad Fuel
Sometimes a sudden loss in performance can be attributed to a bad tank of gas – or an old tank.
As a general rule of thumb, the more fuel being stored the more stable it becomes. This is why it is important to fill your tank and add a stabilizing agent before wintertime storage.
If you let your watercraft sit through the off-season with half a tank of gas or less, there is a better than even chance that condensation has added a bit of water to your mix.
Today’s corn-flavored fuel plays havoc with fuel systems. If at all possible, eschew ethanol at the pump. If you must use ethanol gas, be sure not to let any given tank set for too long a period between rides.
Occasionally you’ll simply purchase a bad batch from a station that has let its storage tanks run low. If you’ve just filled up and experienced poor performance, it might be just that easy. Not that pumping fuel out of your tank is fun, but even at today’s pump prices, it’s worth a shot to use an external pump to remove the offending fuel, then visit another gas station to see if that resolves the problem.
4. Clogged or Fouled Fuel Filter
Before trailering your watercraft to the local mechanic, you may want to have a go at replacing the fuel filter. These filters can sometimes become clogged, and are also one of the components that ethanol based fuel likes to eat up.
Replacing the fuel filter itself isn’t particularly difficult, but gaining access is.
You’ll most likely have to begin by removing inner panels on your front storage compartment to reveal the tank. Disconnect the negative battery cable before proceeding any further.
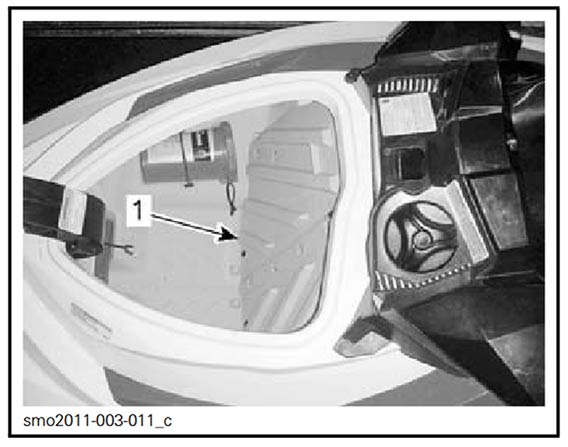
This will provide access to the fuel tank. Two air ventilation hoses will have to be detached from the tank, and reinstalled later. These are normally secured by a clamp with a Phillips head screw for tightening or loosening.
Access is through the big black cap on top of the tank. You’ll need to carefully disconnect an electrical plug or two from the cap. If you are familiar with various types of multi-pin plugs this will not be difficult. If you are not, understand that a tab of some sort will be used to lock the plug into place. This has to be pulled back or aside to allow for removal.
You’ll need to detach the fuel line. But don’t remove the line itself, look for a pin at the side of the connector that will allow easy detachment. Place shop rags around the area, as some spillage will occur when the line is disconnected.
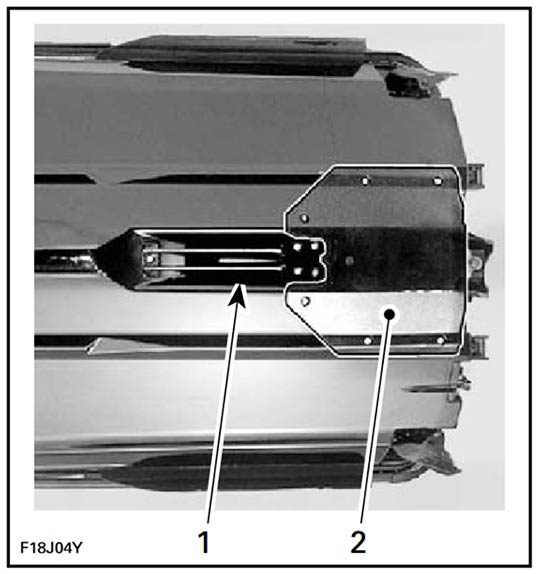
Now, spin the retaining ring away to allow the removal of the fuel pump. Carefully pull the pump out. The filter is located on the underside. It simply snaps on. Remove the old filter by prying it gently off with a flat-blade screwdriver, and snap the new filter into place. There are two plastic tabs on the mounting ring that corresponds to locating pins on the pump housing. Take care to ensure these are properly aligned.
Reinstall the pump. There is a molded arrow on top of the pump, and that has to be aligned with an index mark located on top of the fuel tank. There is a rubber fuel pump module gasket that sits between the lip of the tank and the pump. Replacement is recommended.
Reinstall the retaining ring. Sea-Doo service manuals state this should be torqued to 44-foot pounds.
Reinstall the electrical connector, fuel line (remember the retaining clip), and air ventilation hoses. At this point, you can reconnect the battery and reinstall the access panels.
5. Clogged Fuel Injectors
Another unhealthy byproduct of old gas or ethanol fuel is clogged fuel injectors. If the above fixes haven’t cleaned up the rough idle or running conditions, it’s worth a shot to run a quality cleaner additive through a tank of gas if the watercraft’s running condition allows.
Sometimes an additive will in fact clean your injectors and restore normal fuel delivery. If not, you’ll probably want to take the machine to the dealer for either a proper cleaning or replacement.
To help avoid fuel delivery problems from occurring, it’s important to follow the proper procedures after every ride on your Sea-Doo.
Related: Known issues with Yamaha FX Fuel gauge
6. Motor Runs Well, but Performance is Limited
Oftentimes when a PWC’s engine seems uncompromised yet the speed and acceleration are not what they should be, you can find the problem at the jet pump or intake. If the engine revs fine but the hull itself has vibration and seems to be “running rough” you’ve got a cavitation issue.
Simple fixes include clearing leaves, weeds, or other debris from the intake grate.
Sometimes, however, rocks or shell fragments or the like may have damaged the seal between the impeller and the pump ring.
Sea-Doos are unique in that the pump ring is actually called and designed as a “wear ring” – most manufacturers use metal for this area of the pump, but Sea-Doo’s wear ring is designed to be replaceable when damaged. This is mostly a good thing, but it’s also possible that your unit isn’t damaged, but is simply worn out.
A well-worn wear ring might not maintain proper clearance from the spinning vanes of your impeller. This will detract from the performance of the craft.
It’s easy enough to inspect this area. With your Sea-Doo on a trailer, use a flashlight and peer inside the jet pump housing from the rear. Any obvious gashes, scratches, or missing material is a clear sign that replacement is warranted.
If there is no readily apparent damage, use a set of feeler gauges to check the clearance between the impeller blades and the outer surface. There is virtually no gap on a brand new unit. The maximum allowable clearance is .04 inches, but even that’s a lot. You may have been missing out on the true performance of your craft even if there is no discernible cavitation.
Unfortunately, although the wear ring is designed to be replaced, it’s not designed to be replaced at the dock or in your driveway. The entire pump housing will need to be removed from the hull. Unless your shade-tree mechanic skill will only fit under a very large tree, replacement should be done by a qualified service technician.
7. The Impeller is Damaged
Sometimes a rock or other solid object will bend or chip the impeller. This can be revealed with the same method explained above. Use a flashlight, and observe the condition of the blades.
This again requires the removal of the pump assembly from the hull, and should not be attempted unless you are very confident in your mechanical skills.
8. Reverse Will Not Engage
Sea-Doo’s proprietary Intelligent Brake and Reverse (IBR) system is a fine unit, but the reverse gate can sometimes be accidentally blocked or jammed by a tree branch, rock, or the like. This is the first area to check if the reverse does not want to engage.
Sometimes the gears could become jammed, with the source traceable to a faulty fuse that could easily be replaced. The fusebox is located behind the front storage access panels. This will generally throw a fault warning on the dashboard.
If after checking the above your reverse will still not engage, it’s time to visit your dealer or a qualified mechanic.
Related: How to Solve Sea-Doo OPAS Problem?
Back to the ride!
One hopes that the above information will eliminate the most common issues and get you up and running quickly with minimal trouble or expense.
The procedures described are well within the capability of most that are comfortable with tools and regular maintenance procedures.
On the other hand, if you find a problem particularly daunting, you might be money ahead to consult your local dealer or qualified technician. The last thing you want is to make a small problem into a bigger one!
Related posts:
 Vinyl Wrapping Your Jet Ski: Questions and Answers!
  Jet Ski from Florida to Grand Bahama – All You Need to Know
  Yamaha Waverunner FX vs VX: Discerning the Differences
  Superboat Showdown: Kawasaki Ultra 310R vs. Sea-Doo RXT-X 300
  A Street Legal Jet Ski? Two Nut Jobs Make One!
  Yamaha FZR and FZS – Bridging the gap between two generations of WaveRunner